Power BI Embedded Licensing

In our last post we talked about Power BI Pro and Power BI Premium. To recap, Power BI Pro is a per use license and is more towards content creation and consumption. On the other hand, Power BI Premium is a capacity license and is more for content consumption.

Rather than assigning a Pro license to every individual in your org, you can assign a premium capacity to a workspace to support large number of content viewers.

In this post we will tackle another Power BI offering – Power BI Embedded.

Power BI Embedded

Power BI Embedded is a Microsoft Azure service that lets independent software vendors (ISVs) and developers quickly embed visuals, reports, and dashboards into an application. This embedding is done through a capacity-based, hourly metered model.

Microsoft

Power BI Embedded is an offering by Microsoft where you can embed Power BI visuals, reports, and dashboards in a custom application or in associated Microsoft Services like Teams or SharePoint Online.

How does Power BI Embedded look like in reality?

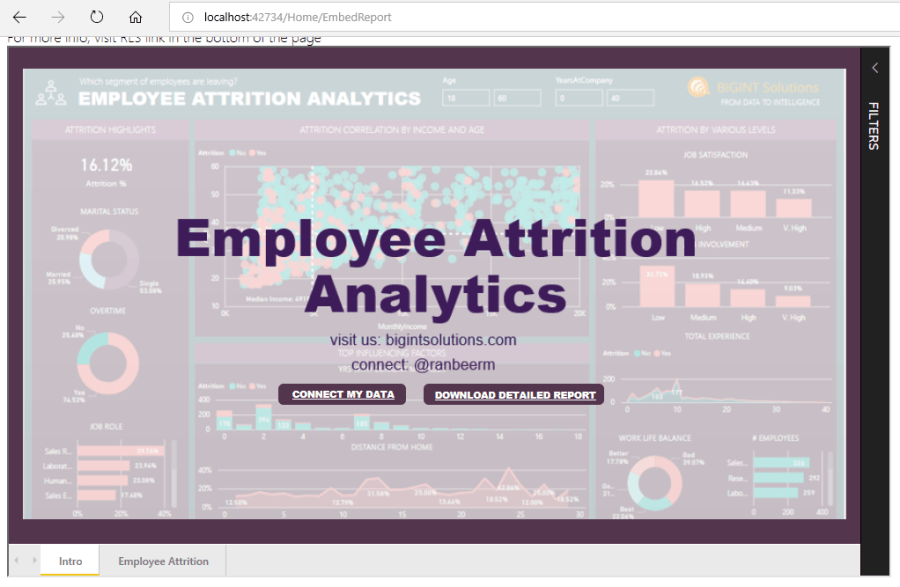
Ok, here’s a screenshot of a Power BI report embedded inside a custom application. By custom application I mean an application which is not app.powerbi.com. It can be a plain vanilla website or a WordPress website or can be a heavy application with Reporting and Analytics section.

In the screenshot below, the sections highlighted in red are part of the custom application. The “SALES PERFORMANCE REPORT” or the part highlighted in green is the Power BI report securely embedded in the application.

You can embed a visual, report, dashboard and Q&A. We have used “report” as a general content for embedding. But the description apply to any of the contents.

How can I embed a Power BI report?

There are 3 ways to embed a Power BI report.

  1. Publish to web. Simplest (and not secure) way of embedding is publishing your Power BI report to web for public access. Note: Anyone with the URL will have access to your report.
  2. No-code Embedding – Simplest and secure. This approach gives you a secure URL to the Power BI report which you can put in your application. However, this will prompt you for Org authentication.
  3. Custom Embedding using JavaScript SDK. This gives you full power of embedding capabilities. You can read more about how to embed using JavaScript SDK in our other blog post.

What licensing do I need to support Power BI Embedding?

Now, that’s a tricky question. For embedding you can choose – P SKU, EM SKU or A SKU.

The licensing to go for really depends on your specific scenario. The general answer to choosing the SKU is “where” the content will be consumed.

  • Choose A SKU if the Power BI content will be consumed in a custom application
  • Choose EM SKU if the Power BI content will be consumed in Teams or SharePoint online (SPO).
  • Choose P SKU if the Power BI content will be consumed in a custom application or Teams or SPO.

**You can even choose a P SKU if you are an enterprise or a Large ISV.

The P SKU is an umbrella SKU which not only gives embedding capabilities but additional feature sets including large read users, AI features, and other enterprise features.

Typically, enterprises go with P SKUs.

How are P, EM and A SKUs different in terms of performance?

Here’s a quick summary of each of the SKUs node performance:

Image source: Microsoft

So an A4 node is same as a P1 node in terms of performance.

It is generally suggested to start with A1 to test and benchmark your capacities, and then take necessary steps to increase the capacity.

Is Power BI Embedded free to use?

No. For production workloads you have to choose from either of the licensing types. For dev workloads, yes you can embed without purchasing a capacity. However, you may hit the token limits and reports may not render.

Next steps?

If you have any questions on this or want to explore Power BI for your organization, do contact us today.

Quick URLs for further reading

Power BI Embedded Capacity: https://docs.microsoft.com/en-us/power-bi/developer/embedded/embedded-capacity

Developer Samples: https://github.com/microsoft/PowerBI-Developer-Samples

Power BI Embedded Playground: https://microsoft.github.io/PowerBI-JavaScript/demo/v2-demo/index.html


I hope this post provides some understanding on Power BI Embedded, licensing and consideration for choosing this type of offering.


Power BI Embedded for Gov clouds

Most of the articles/posts/questions published on community or websites would be on Power BI “Commercial” product. The URL you have seen would be https://app.powerbi.com

This blog post is about “https://app.powerbigov.us” – Power BI URL for US Gov customers. More specifically this blog post is about embedding Power BI assets (Reports, Dashboards, QnA) for US Gov customers.

I would like to highlight certain differences in app registration URL and config URLs when embedding Power BI assets for US Gov clouds.

-> App Registration URL

The app registration URL for commercial cloud and US Gov cloud for Power BI Embedded are different. For:

  1. Commercial Product -> https://dev.powerbi.com/apps
  2. US Gov Product -> https://dev.powerbigov.us/apps

-> When you register your app, the Power BI API name in Azure Portal would look like this:

Commercial Product

commercialproduct

US Gov Product

govproduct

TIP: Based on our experience, when troubleshooting please look out for the API name that you see in Azure Portal. If you are embedding for Gov clouds, the API name should be “Microsoft Power BI Government Community Cloud”. If that is not the name, you would need to register the app on https://dev.powerbigov.us/apps

-> Embedding Config URLs

Commercial Product

commercialproductconfig

US Gov Product

govproductconfig

You would see “resourceUrl”, “apiUrl” and “embedUrlBase” is different in case of US Gov clouds.

That’s it. These are the only changes in configuration and setup required for embedding in Power BI US Gov clouds. Everything else remain the same.

If you are looking for details on embedding with a sample .NET code, please head to our  blog post on baby steps to embed your Power BI report.

Apply the configuration changes as mentioned in this blog post and you would be set to see the Power of embedded analytics for your US Gov clouds.

Questions? Please contact us through our website.

Thank you

Steps to embed your Power BI reports

There are three major steps in setting up Power BI Embedded for your Power BI Reports. These steps apply to embed your dashboards or Q&A

In this blog post we will be setting up Power BI Embedded for ISV or “App owns data” scenarios. The scenario where your users need not have Power BI License to view reports. You embed Power BI Reports in your custom application say, e-commerce site, or health app etc. for your end users.

Here are those three major steps to embed your reports.

Note: Some of the settings differ when you embed for US Gov clouds. Read our brand new post on settings when embedding for US Gov clouds here

1. Register application

2. Set up permissions in Azure Portal

3. Set up sample code to embed Power BI Reports


Step 1: Register application

Step by Step guide.

a. Go to https://dev.powerbi.com/apps and register your application. This step is required since Power BI Rest APIs or .NET SDK requires an “application” to connect to Power BI to get token for embedding.

This application is not your custom application (or portal) where the reports will be embedded.

b. Login with your Power BI Account. This is the account where you have Pro or Premium license assigned. This could be yours or a master account (non-human).

c. Add the following setup. You can put any Application Name, but Application Type should be “Native”

d. Select APIs to access. If you only want to “view” reports, select “Read all reports”, “Read all datasets”, and “Create content”. If you want to embed in edit mode, select “Read and write all datasets”, “Read and write all reports”, and “Create content”. We will/can change these in Azure Portal later.

Note: We have seen if you do not select “Create content” permissions, requests to Power BI APIs fail with 403 error.

e. Click on “Register” button. You will receive your client id (or application id as it is called in Azure Portal). Keep it handy

Step 2: Set up permissions in Azure Portal

Let’s log in to Azure Portal using our Power BI account (the account used to register application above).

a. Login to portal.azure.com

b. Navigate to the Azure Active Directory in the left panel and click on App Registrations. If you do not see your app you just created, select “All Apps” instead of “My Apps”

pbiazureappreg.PNG

c. Click on “PBIEmbedApp” and then on Settings and Required permissions

pbiazureclickpermissions.png

d. On the Required permissions, select Power BI Service. Here you can enable/disable any permissions. 

Click on “Save”.

pbiazurepbiservice.PNG

e. After saving you would see “3” delegated permissions for Power BI Service. While Power BI Service is selected, click on “Grant permissions”.

pbiazure3grant.PNG

This would grant permissions to your app.

pbiazuregrant.PNG

You are set to embed your reports now! You would need 3 things to embed your report in your application.

a. Your app’s client id (Remember I had asked you to keep that handy above). If you miss it no worries, go to Azure Portal and grab the “application Id” for your app under Azure Active Directory. This is nothing but your client id.

b. Power BI Report Group ID and Report ID. How do you find out your report’s group id and report id? Navigate to your Power BI report in Power BI portal. Copy the URL

pbiurl.png

Anything after “groups/” but before “/reports” shown above in red box is group_id, and anything after “reports/” but before the last “/” shown above in blue box is report_id. Copy them.

c. Your Power BI username and password. Usually in ISV or App owns data scenarios this is a master account. This means it can be a person’s account like you or me or any other account which nobody (or I must say “no human”) will use.

Step 3: Set up sample code to embed Power BI Reports

Download sample code from Microsoft’s GitHub repo. You will need to use “PowerBIEmbedded_AppOwnsData” project.

Github URL: https://github.com/microsoft/PowerBI-Developer-Samples/tree/master/.NET%20Framework/Embed%20for%20your%20customers/PowerBIEmbedded_AppOwnsData

Go to web.config and update the following settings – applicationId, workspaceId, reportId, pbiUsername, pbiPassword.

pbicodesettings.PNG

Your client id is application id and group id is workspaceid.

Run the application in Visual Studio, and you will see your report embedded!

pbiembed.PNG

If you have any questions, feel free to comment on the blog post, or contact us.

Note: Some of the settings differ when you embed for US Gov clouds. Read our brand new post on settings when embedding for US Gov clouds here

Resolved – Request is not a valid SAML 2.0 protocol message – when embedding Power BI Reports with federated authentication

Phew! Finally, we were able to resolve the error “Request is not a valid SAML 2.0” when embedding Power BI Reports with federated authentication. It took us some time but thanks to the wonderful Microsoft support team who worked with us in debugging and isolating the issues.

Our scenario: Enterprise customer with Power BI Premium capacity planning to embed Power BI reports in an internal application using “App Owns Data” approach. There are scenarios why would you embed for enterprises (also called as organizational embedding), and scenarios why would you use “App Owns Data” approach over “User owns Data” approach. More about this in another blog post.

Ok, then why this error? How to solve it?

Why this error:

When you authenticate using master account the request goes to a federated server (in this case customer’s Identity Provider (IdP)), the IdP validates the credentials, sends back SAML assertion and TokenType, the Azure AD .NET libraries check the TokenType and assigns granttype. This granttype and SAML assertion is sent to Azure AD for confirmation.

In our particular case, the PingFederate Identity server was using a TokenType which Azure AD .NET SDK assumed to be of 2.0 and hence tagged granttype as “2.0” (urn:ietf:params:oauth:grant-type:saml2-bearer). But the assertion was not 2.0, it was actually 1.1.

Hence the error – Request is not a valid SAML 2.0 protocol message.

How to solve this error?

There are two ways to solve this error:

  1. Create a cloud account on customer’s tenant which would not be federated (simple solution), example: abc@tenantname.onmicrosoft.com
  2. Create SAML requests manually, fire to your IdP, modify the TokenType in the code and send this request to Azure AD. You will have to bypass using Azure AD libraries and construct your own requests. (complex solution)

We went ahead with solution 1, used this cloud account as our master account and were able to successfully embed the reports in enterprise internal applications.

You will not face this issue if your IdP is ADFS.

Hope this helps,

Until then,

Ranbeer Makin

Let me show you the secrets of setting up Power BI Premium for embedding scenarios

Hola!

One of our enterprise customers approached us for embedding their Power BI reports, dashboards and Q&A in their application. They had purchased Power BI Premium SKU and want to use Power BI embedded capabilities. In this blog post, we will explain how we helped our customer setup workspace with premium capacity and use it for embedding reports.

A quick recap of embedding your reports in Power BI:

  1. A master account (a user basically) with Power BI pro license in Azure AD tenant
  2. An application in Azure AD and with permissions setup (more on this in next blog)
  3. A workspace (or groups) to publish reports to be used in embedding
  4. User created in #1 to be admin of this newly created workspace

How do we assign premium capacity to this newly created workspace?

1. Go to “Settings icon” in PowerBI.com, and select “Admin portal”

AdminPortal


2. Inside of the Admin portal, select premium settings

PremiumSettings

3. On premium settings screen, select the capacity that you want to use

4. Click on “Assign Workspaces” in the capacity you have selected

AssignWorkspaces

5. You will be presented with a screen, add the user that you created initially (a master user, remember?)

AssignWorkspaces2

6. After this, go to this new workspace, edit it, and ensure in advanced settings “Premium” is ON. You need to have workspace assignment permissions in order to enable it.

PremiumOff

7. When selecting “ON”, select the appropriate Premium capacity that you want to assign to this new workspace

PremiumOn

Hit Save, you are done!

Now this workspace has Premium capacity turned ON. How do you verify it?

Go to this capacity in premium settings and check if this workspace is assigned.

workspacelisted

You are ready to embed your reports. You need to get a token, write some JavaScript and backend code and you are done!

Do you have questions? Let us know.

Contact us if you want to embed Power BI Reports, Dashboards or Q&A. We have helped enterprises, medium to small sized businesses develop and embed Power BI reports using varied sources of data with data sourcing, modeling, and compelling visualizations and analytics.

Or, head to our premium showcase section to see some of our work live in action.


Reference: https://www.youtube.com/watch?v=0Cy1V6LYjng